This guide will show you how to construct a high performance, extremely low noise muffler for your small engine. In order to build this simple muffler, you will need a few very common tools, epoxy, copper piping, a tin can and a soda can. It is basically built from garbage and glue.
Required Tools
- Drill and 1/4" bit
- Center punch
- Knife or scissors
- Large file
- Steel wool
- Pipe cutter (a hacksaw will work fine)
Required Supplies
- 12" copper 1/2" copper tubing (cut in half)
- Wide 15oz tin can
- Standard 12oz soda can
- High heat epoxy (ex. JB weld)
- Pipe wrap (3 1/2' or enough to cover the tin can)
- 2 x 3 1/2" hose clamps
Preparing the soda can
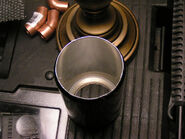
In order to ready the soda can, we will need to cut its top and bottom so that it can sit at the exact height of the inside of the tin can.
The bottom. In order to reserve as much of the lower can as possible, use the file to grind down the bottom ridge of the can until the convex dome begins to fall out. By this time, the aluminum should be so thin you can pull it apart or cut it with a small knife. If any jagged edges remain, you can clean them off with the file.
The top. Carefully cut through the top of the soda at a height level with the top of the tin can while the soda can is resting inside of it. It is more important to have the top of the soda can be level than it is to have the top of the soda can be at the exact height. A hacksaw, knife or scissors should do fine at this task.
The sides. Now we will cut many small holes in the sides of the can in order to restricted movement of air. With a simple stab and twist motion of the point of the knife you can easily cut semi-round holes into the thin, soft aluminum of the side of the can.
Preparing the tin can
The tin can will need to be scuffed with steel wood in order for the epoxy to stick properly. Holes will also need to be cut in order for the pipes to fit through.
Scuffing it up. On the bottom and top of the tin can, there is a thin slippery layer that we will need to remove in order for our inner muffler workings to sick with epoxy. Take the steel wool and use your file to press it aggressively against the bottom of the can. You will know when you are done because you will see shiny metal looking back at you. Do the same to the bottom on the can's lid.
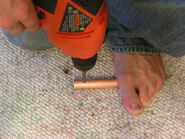
Cutting for the pipes. Because of the thinness of the tin of the can, you won't be able to simply take a 1/2" drill bit to make a nice clean hole in the lid and bottom of the can for the pipes. Unless you have a half-inch hole-punch, you'll have to get down and cut at the can itself. It can be helpful to first drill a 1/4" hole into the can and cut outward to the perimeter of the pipe. You should then be able to press the pipe into the can as if you were inserting a straw into a fast-food drink.
As for the placement of the holes, you're going to have to eye that one up carefully. Since the lid can rotate any direction, it is not important where in the circle the hole is drilled, but how far off center that will get you. If you take the pipes and separate them 1/4" from the center on the can, mark your holes and work from there, you should be able to see how they will eventually line up inside the can.
Preparing the copper piping
Cut the 12" of copper tubing to the right height for your particular can. In the pictured examples, the mistake was made to simply cut the tube in half before continuing. This resulted in difficult cutting later the intake and exhaust of the muffler being far too long. Don't make this mistake. Make sure this is the last time you will need to cut the tubing. The best way to find the correct height is to put the soda can inside the tin can and place the piping in the middle. From there, you should be able to eye up the height you want. You'll want the pipes to protrude from the can at least an inch after your done so add about an inch to the height of the can. (In the example, 5" was the perfect length for the pipes.)
After cutting the pipe, make sure each pipe has one perfectly flat end. This will be important when we are setting up the epoxy later. If the pipe has a perfectly flat end, we can simply stand it up in epoxy and wait for it to cure. It the end is not flat, the pipe will lean to the side and the holes will not match up. If either of the pipes do not have a true end, use the file to clean it up.
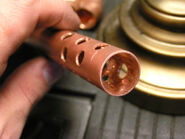
Drilling the ends In order to provide a place for the air to breath from the pipe, we will need to drill at least 10 1/4" holes in the end of both pipes. Make sure that you cluster the holes on an end of the pipe that is perfectly flat. This will be the end that we epoxy down later. It is not important that these holes are pretty since no one will ever see them, but you do want them relatively equally spaced. In the example, 15 holes were drilled in each pipe for a total of 30 holes.
A good way to test if you have drilled enough is blow into it the pipe as hard as you can. Then, hold your hand over the end of the pipe and try again. If you felt any more resistance with the end plugged by your hand than you did without, drill more.
Epoxying it together
Epoxy down the soda can. The first thing that you will want to do is epoxy down the soda can inside of the tin can so that the soda can is equally spaced from all sides of the tin can. This is your last chance to make sure that the top of the soda can is level and is low enough into the tin can to allow the lid to sit on it properly when it is epoxied in place. In the example, the lid sat 1mm above the top of the tin can and required a considerable amount of epoxy to be help in place. You want your lid to be 1mm below the top of the tin can.
Epoxying the pipes. You'll now need to epoxy the pipes onto the lid and bottom of the can. You'll want to make sure that you have something level to set both of them onto for the epoxy to cure since the pipes will only be held in place by gravity while you wait. Glue down the pipes in the positions opposite the holes you cut earlier with the drilled end of the pipe down. Since the tin of the can is flexible and epoxy can make up for mistakes, this does not have to be perfect, but the better you line this up now the less of a headache it will be later.
Epoxying the can closed. You should now be able to slide the two sides together after lining up the pipes to the holes that have been cut for them. If the lid falls flat onto the soda can, you know you have down well. Pull the assembly apart again, make sure you get plenty of epoxy between the top of the soda can and the bottom of the tin lid and press it together. This bond will make sure that the can doesn't brake free and turn your silent muffler into a maraca.
You'll now need to seal up the can. The way your can opener opened the can will gauge how much epoxy you'll need in order to close the can again. In the pictured example, the can opener cut the lid itself which made epoxying the lid to the top of the can exceedingly difficult. A side-cutting can opener would have negated this problem.
Make sure that you epoxy the protruding ends of the pipe to the top and bottom of the can. We'll need to use epoxy to make sure that the can is air tight. After the epoxy has cured, you can test your seal by plugging one pipe and blowing into the other.
Wrap up

The finished muffler.
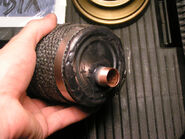
Your can is now together and will probably function pretty well, but it is horrendously ugly and makes a slight pinging noise with each "pop" that comes from the engine. Take the pipe wrap, cover the can and clamp the wrap down with the two hose clamps. This will eliminate the pinging noise and make the muffler much more attractive. Note that you can also use emergency muffler wrap which is self-sticking and wraps itself nicely around a hot muffler. No clamps needed.
Before you mount up your new muffler, give it one last test blow to make sure there is no restriction that would limit the flow of your exhaust. If all is well, mount it up however makes sense and enjoy the sweet loving smiles from your neighbors.


